Safety & Care
The Ergonomics of Scissors Positioning: Protecting Your Hands and Wrist
Are you tired of experiencing hand and wrist pain while using scissors? Do you often find yourself struggling to maintain a comfortable grip or positioning? If so, you’re not alone. The ergonomics of scissors positioning is a topic that often gets overlooked, yet it plays a crucial role in protecting your hands and wrists from injury.
In this blog post, we will delve into the mechanics of scissoring and explore why proper scissors positioning is so important. We’ll debunk common myths surrounding this topic and provide practical tips for safely using scissors. Whether you’re an adult professional or a parent helping your child with crafts, understanding the correct techniques can make all the difference in preventing hand and wrist injuries.
But it doesn’t stop there! We’ll also discuss ergonomic factors to consider when choosing scissors, exercises for strengthening your hands and wrists, as well as proper maintenance and care to prolong the lifespan of your trusty cutting tool. So let’s dive right in! It’s time to master the art of safe scissor usage for optimal comfort and protection.
Understanding Scissoring and its Mechanics
Scissoring, as the name suggests, involves the motion of two blades coming together and opening apart like a pair of scissors. It is a fundamental movement used in various activities such as cutting paper, fabric, or even hair. Understanding the mechanics behind scissoring can help us grasp why proper positioning is essential.
When you squeeze the handles of a pair of scissors, the blades pivot at a central point called the fulcrum. This allows for controlled and precise cutting motions. The angle at which you hold your hand while using scissors determines how efficiently force is transferred to the blades. Hence, finding an optimal hand position plays a vital role in reducing strain on your hands and wrists during prolonged use.
Remember: mastering scissoring techniques goes beyond simply pressing down with force! By understanding its mechanics and adopting proper positioning principles, you can protect yourself from unnecessary strain and potential injuries when using scissors for any task at hand.
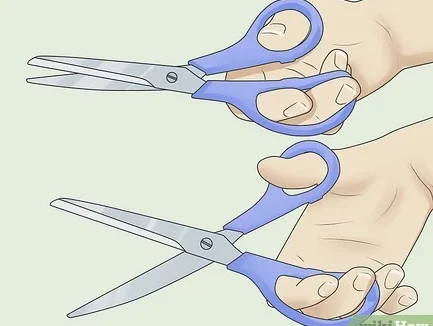
The Importance of Proper Scissors Positioning
Proper scissors positioning may seem like a small detail, but it plays a significant role in protecting your hands and wrists from strain and injury. When using scissors, the way you hold them can make all the difference in maintaining optimal hand posture and reducing muscle fatigue.
Holding scissors correctly allows for better control and precision. By gripping the handles with your thumb on one side and fingers on the other, you create stability that enables smoother cutting motions. This grip also helps distribute pressure evenly across your hand, preventing excessive strain on any one area.
Proper positioning promotes ergonomic alignment of your wrist. Holding scissors at an angle allows for a natural extension of the forearm without putting unnecessary stress on the joint. It minimizes awkward bending or twisting of the wrist, which can lead to discomfort or even repetitive motion injuries over time.
Taking the time to learn and practice correct scissor technique is vital for anyone who uses them regularly – from artists to office workers to children in school. So next time you reach for those trusty shears, remember to position them properly for improved comfort and protection!
Common Myths about Scissors Positioning
When it comes to scissors positioning, there are several common myths that have been circulating for years. One of the most prevalent misconceptions is that holding scissors with your fingers at the very tip will provide better control. However, this can actually strain your hand and wrist muscles, increasing the risk of injury.
Another myth is that using larger scissors will automatically result in better cutting performance. In reality, using scissors that are too big for your hand can lead to awkward angles and excessive force, putting unnecessary strain on your joints. It’s important to find a pair of scissors that feels comfortable in your hand and allows for proper finger placement.
Remember, don’t fall victim to these common myths about scissors positioning! Understanding the correct techniques and debunking these misconceptions is essential for protecting your hands and wrists while using scissors.
Tips for Safely Using Scissors
When it comes to using scissors, safety should always be a top priority. Here are some helpful tips to ensure you’re using scissors safely and protecting your hands and wrists.
Make sure you have a comfortable grip on the scissors. Avoid gripping them too tightly as this can strain your fingers and hand muscles. Instead, hold them with a relaxed but firm grip for better control.
Always position the scissors correctly before cutting. Place your thumb in the larger loop and your middle or index finger in the smaller loop. This positioning allows for optimal leverage and reduces strain on your wrist.
Proper scissor technique is key to preventing injuries while cutting paper or other materials. So follow these tips to keep yourself safe!
Age-Appropriate Scissors Techniques
When it comes to using scissors, one size does not fit all. Different age groups require different techniques for safe and effective scissor use. Teaching children the proper way to handle scissors from a young age can help prevent accidents and promote good hand-eye coordination.
For younger children, safety scissors with blunt tips are recommended. These scissors have a spring mechanism that automatically opens the blades after each cut, making it easier for little hands to control. It’s important to teach them how to hold the scissors correctly – with their thumb in one loop and their fingers in the other – and guide them through simple cutting exercises.
As children grow older and develop more advanced motor skills, they can graduate to regular child-sized scissors with sharp blades. Encourage them to position their thumb in one loop and their middle finger or index finger in the other loop while keeping their ring finger or pinky finger tucked away safely. This grip allows for better control and reduces strain on the hand muscles. Remember, always supervise children when they’re using scissors until you’re confident they can do so safely on their own!
Video Examples of Proper Scissors Technique by Age
When it comes to using scissors, proper technique is key. But what exactly does that look like? Well, lucky for you, we have some video examples of proper scissors technique broken down by age group.
For our littlest scissor users, ages 3-5, the focus is on developing hand-eye coordination and fine motor skills. In the video example for this age group, you’ll see how children hold the scissors with their thumb in one handle and their fingers in the other. They learn to open and close the blades smoothly while maintaining control.
As kids get older (ages 6-8), they start to refine their cutting techniques. In this video example, you’ll notice that they use a more advanced grip where all four fingers are inside one handle and only the thumb goes into the other. This allows for better precision and control while cutting.
Check out these videos to see proper scissors technique in action! And remember, regardless of age or skill level, always prioritize safety when using scissors.
Preventing Hand and Wrist Injuries
In the world of scissors positioning, protecting your hands and wrists is crucial. The repetitive motion of cutting can put strain on these delicate areas, leading to potential injuries. But fear not! There are simple steps you can take to prevent such injuries.
It’s important to maintain proper form while using scissors. Ensure that your wrists are in a neutral position, neither flexed nor extended. Avoid gripping the scissors too tightly as this can increase tension in your hand muscles. Additionally, taking regular breaks during prolonged scissor use allows your hands and wrists to rest and recover.
Consider using ergonomic scissors that are designed with comfort in mind. These specialty tools often feature cushioned handles or adjustable blades to reduce strain on your hands and wrists. Investing in quality scissors may seem like a small step but can make a significant difference in preventing injuries.
Remember, safeguarding your hands and wrists should be a top priority when it comes to scissors positioning. By practicing proper technique and utilizing ergonomic tools, you can enjoy pain-free cutting sessions for years to come!
Ergonomic Factors to Consider
When it comes to scissors positioning, considering ergonomic factors is crucial in order to protect your hands and wrists. One important factor to consider is the size and weight of the scissors. Opt for lightweight scissors that are comfortable to hold, as heavy ones can strain your hand muscles over time.
Another factor is the handle design. Look for scissors with ergonomic handles that provide a comfortable grip and minimize pressure on your fingers. The angle of the blades also plays a role in ergonomics – make sure they are properly aligned so that you don’t have to twist or contort your wrist while cutting. By paying attention to these ergonomic factors, you can reduce the risk of hand and wrist injuries associated with improper scissor use.
Exercises for Strengthening Hands and Wrists
Taking care of your hands and wrists is crucial to maintaining their strength and flexibility. By incorporating a few simple exercises into your daily routine, you can help strengthen these important muscles.
First, try wrist curls with light dumbbells or resistance bands. Hold the weight in your hand with your palm facing up, then slowly curl your wrist upward towards your body. Repeat this motion for 10-15 repetitions on each side.
Another effective exercise is finger flexion and extension. Start by spreading all of your fingers apart as wide as possible, then slowly bring them together to touch each other. After that, extend them back out again. This exercise helps improve dexterity and flexibility in the fingers.
Remember to always listen to your body while performing these exercises – if you feel any pain or discomfort, stop immediately. Consistency is key when it comes to strengthening muscles, so aim to incorporate these exercises into your routine at least 2-3 times a week.
By taking just a few minutes each day to focus on strengthening the muscles in your hands and wrists, you can help prevent injuries and maintain optimal function for everyday tasks!
Proper Scissors Maintenance and Care
Taking care of your scissors is essential to ensure their longevity and optimal performance. By following a few simple maintenance steps, you can keep your scissors in top shape for years to come.
It’s important to regularly clean your scissors after each use. Wipe the blades with a soft cloth or tissue to remove any residue or debris that may have accumulated during cutting. This will prevent build-up and maintain the sharpness of the blades. Additionally, make sure to oil the pivot point periodically using a drop of sewing machine oil or specialized scissor lubricant. This will keep the blades moving smoothly and prevent them from becoming stiff or jammed.
Next, always store your scissors in a safe place when not in use. Avoid tossing them into drawers where they can get damaged or bent out of shape. Consider investing in a protective sheath or case that will keep them secure and protected from accidental knocks or bumps.
By practicing good maintenance habits like cleaning, oiling, and proper storage, you’ll prolong the life of your scissors while ensuring they remain sharp and reliable whenever you need them!
Finding the Right Scissors for You
Finding the right scissors for your needs is crucial when it comes to protecting your hands and wrists. With so many options available on the market, it can be overwhelming to choose the perfect pair.
Consider the size and weight of the scissors. You want a pair that feels comfortable in your hand and doesn’t strain your muscles during use. Additionally, look for ergonomic features such as cushioned handles or adjustable tension settings that can help reduce fatigue and increase control. Remember, finding scissors that fit well with your hand shape will greatly improve both comfort and cutting precision.
Think about the type of tasks you’ll be using them for. Are you an avid crafter? Look for scissors with sharp blades designed specifically for cutting fabric or paper. If you’re a hairdresser or barber, invest in professional-grade shears that are specially crafted to provide precise cuts without straining your hand muscles.
By taking these factors into consideration, you can find a pair of scissors tailored to meet your unique needs while also prioritizing ergonomics and safety!
Conclusion
In this article, we have explored the importance of proper scissors positioning and its impact on protecting your hands and wrists. By understanding the mechanics of scissoring and debunking common myths about scissors technique, you can ensure a safer cutting experience.
We’ve provided tips for safely using scissors, including age-appropriate techniques that promote healthy hand development in children. Watching video examples of proper scissors technique by age can be helpful in visualizing these concepts.
To prevent hand and wrist injuries, it’s crucial to consider ergonomic factors such as maintaining a neutral posture, choosing the right size and type of scissors, and incorporating exercises to strengthen your hands and wrists.
Proper maintenance and care of your scissors are also essential for optimal performance. Regularly cleaning them, keeping them sharp, and storing them properly will prolong their lifespan while minimizing strain on your hands.
Finding the right pair of scissors for you is key to ensuring comfort during use. Consider factors such as handle design, blade material, cutting capabilities, and any additional features that may suit your specific needs.

Introduction
Engine oil plays a critical role in keeping your vehicle running smoothly. It’s designed to lubricate engine components, reduce friction, and protect against wear and tear. Among the many options available, 5W-20 and 5W-30 are popular choices, each with its own set of benefits. But what if you find yourself with both types on hand? Is it safe to mix 5W-20 and 5W-30? In this article, we’ll delve into the implications of mixing these two oils and what it means for your engine’s health.
Understanding Engine Oil Viscosity
What Does 5W-20 and 5W-30 Mean?
The numbers in oil grades like 5W-20 and 5W-30 indicate the oil’s viscosity, or thickness, at different temperatures. The “5W” stands for the oil’s viscosity in winter (low temperatures), while the “20” or “30” represents its viscosity at high temperatures.
- 5W-20: This oil has a lower viscosity when cold, making it easier to flow in colder conditions. It is often recommended for newer engines for better fuel efficiency.
- 5W-30: This oil has a higher viscosity at operating temperatures, providing better protection in warmer conditions and high-stress situations.
The Role of Viscosity in Engine Performance

Viscosity affects how well oil flows through your engine. Proper viscosity ensures that the oil effectively lubricates engine parts, reduces friction, and prevents overheating.
- Lower Viscosity Oils: These flow more easily at startup and in cold conditions, but might be less effective under high heat.
- Higher Viscosity Oils: Provide better protection at high temperatures but can be thicker at startup.
How Oil Viscosity Affects Engine Longevity
Using the right viscosity for your engine ensures optimal performance and longevity. Using oil with inappropriate viscosity can lead to insufficient lubrication, increased wear, and potential engine damage over time.
Can You Mix 5W-20 and 5W-30?
Common Reasons for Mixing Oils
Drivers might mix oils for various reasons, such as running low on one type, or having different types of oil available. However, this practice can raise questions about safety and effectiveness.
Technical Feasibility of Mixing Different Viscosities
Technically, mixing 5W-20 with 5W-30 is possible because both are compatible with each other. The combined viscosity will fall somewhere between the two, but this can vary depending on the proportions mixed.
Manufacturer Recommendations and Warnings
Most vehicle manufacturers recommend using a specific oil grade for optimal performance. Mixing different grades might not align with these recommendations and could affect the oil’s performance. Always check your vehicle’s manual for the manufacturer’s guidance.
Pros and Cons of Mixing 5W-20 and 5W-30
Potential Benefits
- Flexibility: Mixing can be a temporary solution if you’re in a pinch and need to top off your oil.
- Cost Efficiency: It might be cost-effective in the short term if you already have both types of oil.
Possible Drawbacks and Risks
- Compromised Performance: The mixed oil might not offer the best protection or efficiency.
- Increased Wear: Long-term use of mixed oils could lead to increased engine wear and reduced efficiency.
Impact on Engine Performance
How Mixing Affects Lubrication
Mixing oils alters the viscosity and can impact how effectively the oil lubricates the engine. This might lead to reduced protection, especially under extreme conditions.
Potential Effects on Engine Efficiency
The efficiency of the engine could be compromised if the mixed oil does not perform as intended, potentially affecting fuel economy and overall performance.
Long-Term Consequences for Engine Health
Regular use of mixed oils might result in long-term damage or reduced engine longevity. It’s best to use the recommended oil type to ensure optimal engine health.
Best Practices for Oil Maintenance
Choosing the Right Oil for Your Engine
Always use the oil grade recommended by your vehicle’s manufacturer. This ensures optimal performance and protection for your engine.
Regular Oil Changes and Maintenance Tips
Regularly changing your oil as recommended helps maintain engine performance and longevity. Follow your vehicle’s maintenance schedule for oil changes.
Monitoring Oil Levels and Quality
Regularly check your oil level and quality. Low or dirty oil can affect engine performance and lead to potential damage.
Alternatives to Mixing Oils
Using Single-Grade Oils
Using a single grade oil as specified by your manufacturer is the best practice for engine health and performance.
Synthetic vs. Conventional Oils
- Synthetic Oils: Offer better performance and protection, especially under extreme conditions.
- Conventional Oils: More affordable but may not provide the same level of protection.
Recommended Oil Types for Different Engines
Consult your vehicle’s manual for the best oil type and grade for your engine. Different engines have different requirements based on their design and performance needs.
What to Do if You’ve Mixed Oils
Steps to Take if You’ve Mixed 5W-20 and 5W-30
If you’ve mixed oils, it’s generally recommended to replace the oil with the correct grade as soon as possible.
When to Seek Professional Advice
If you’re unsure about the impact of mixing oils or need guidance on oil replacement, consult a professional mechanic.
How to Flush and Replace Engine Oil
Flushing the engine and replacing the oil with the recommended grade ensures optimal performance and protection. Follow proper procedures or seek professional help.
Conclusion
Mixing 5W-20 and 5W-30 oils might seem like a convenient solution, but it can compromise your engine’s performance and longevity. The best practice is to use the oil grade recommended by your vehicle’s manufacturer and adhere to regular maintenance schedules. Ensuring you use the correct oil type helps maintain engine efficiency and longevity.
FAQs
What happens if you mix 5W-20 and 5W-30 oil?
Mixing these oils creates a blend with intermediate viscosity, which may not provide optimal performance or protection.
Can mixing these oils damage your engine?
Long-term use of mixed oils can potentially cause increased wear and reduce engine efficiency.
How often should you change your engine oil?
Follow your vehicle’s manufacturer recommendations, typically every 3,000 to 7,500 miles or as specified.
Is synthetic oil better than conventional oil?
Synthetic oil generally offers better performance and protection, especially under extreme conditions, compared to conventional oil.
What should you do if you accidentally mix different oil viscosities?
Replace the mixed oil with the recommended grade as soon as possible to maintain optimal engine performance and protection.

Introduction
Border Collies, renowned for their intelligence and agility, are a breed that excels in a variety of activities. While their herding skills are well-documented, many may not realize that Border Collies also have a natural affinity for water. This article delves into the fascinating relationship between Border Collies and water, exploring their history, traits, and the benefits of water activities for these energetic dogs.

History of Border Collies
Border Collies originated along the border of Scotland and England, bred specifically for their herding abilities. These dogs were developed to manage flocks of sheep over rough terrain, making them indispensable to shepherds. Over time, their intelligence and agility became key characteristics, allowing them to excel in various roles beyond herding.
Physical Traits of Border Collies
Border Collies are known for their lean and athletic build, which contributes to their incredible agility. Their double coat, consisting of a dense undercoat and a rough outer coat, provides some resistance to water, helping them stay comfortable during water activities. This coat also helps protect them from harsh weather conditions, whether they are herding sheep or swimming in a lake.
Behavioral Traits
One of the most notable traits of Border Collies is their intelligence. Ranked among the smartest dog breeds, they are highly trainable and responsive to commands. This intelligence, combined with their natural herding instincts, makes them keen problem solvers and quick learners. These traits also contribute to their enthusiasm for water activities, as they are always eager to explore and engage in new experiences.
Why Border Collies Love Water
Border Collies’ love for water can be attributed to their natural instincts and curiosity. Water offers a new environment for them to explore, and their high energy levels make swimming and playing in water ideal activities. Additionally, water activities provide a great way for them to cool off, especially during hot weather.
Swimming and Border Collies
Introducing your Border Collie to swimming can be a rewarding experience. Start in shallow water, allowing them to get used to the sensation of being wet. Gradually encourage them to venture deeper, using toys or treats as incentives. Many Border Collies take to swimming naturally, but patience and positive reinforcement are key.
Safety Tips for Border Collies in Water
While Border Collies may enjoy water, safety should always be a priority. Monitor them closely for signs of fatigue, and ensure they have a life vest, especially in deeper waters. It’s also important to provide them with regular breaks and fresh water to prevent dehydration.
Activities Involving Water
Water opens up a range of fun activities for Border Collies. Fetch and retrieval games can be enhanced by playing in water, offering both physical exercise and mental stimulation. Dock diving is another popular activity, where Border Collies can showcase their agility and jumping skills in a competitive setting.
Border Collies and Water Herding
Interestingly, some Border Collies have been known to herd in water. This unique practice involves guiding flocks through streams or ponds, showcasing their versatility and herding prowess. Historical anecdotes highlight the remarkable ability of these dogs to adapt their herding techniques to various environments.
Training Border Collies for Water Activities
Training your Border Collie for water activities requires a step-by-step approach. Start with basic commands on land, then gradually introduce them to water. Use positive reinforcement, such as treats and praise, to build their confidence. Consistency and patience are essential for successful training.
Benefits of Water Activities for Border Collies
Water activities offer numerous benefits for Border Collies. Physically, swimming is an excellent form of exercise that builds strength and endurance without putting stress on their joints. Mentally, water activities provide stimulation and an opportunity to engage their problem-solving skills.
Challenges with Border Collies and Water
Despite their natural affinity, some Border Collies may face challenges with water. Fear or anxiety can be common, but these can often be overcome with gradual exposure and positive experiences. Preventing overexertion is also crucial, as Border Collies can sometimes be too enthusiastic for their own good.
Health Considerations
Regular health checks are important for Border Collies, especially if they frequently engage in water activities. Ear infections are a common issue due to moisture, so proper ear care is essential. Always ensure your Border Collie is up-to-date with vaccinations and parasite prevention.
Border Collies’ Water Adventures
Many Border Collie owners have fascinating stories of their dogs’ water adventures. From epic beach runs to impressive dock diving feats, these stories highlight the breed’s love for water. Some B’order Collies have even gained fame for their water skills, becoming stars in dog sports and competitions.
Conclusion
Border Collies and water share a natural affinity that can be incredibly rewarding for both the dog and the owner. With their intelligence, agility, and enthusiasm, B’order Collies are well-suited for a variety of water activities. By understanding their traits and taking appropriate precautions, you can ensure a safe and enjoyable experience for your furry friend.
FAQs
How can I get my B’order Collie to enjoy water?
Start by introducing them to shallow water and use toys or treats to make the experience positive. Gradually increase their exposure and always use positive reinforcement.
Are B’order Collies natural swimmers?
Many B’order Collies are natural swimmers, but not all. Patience and training are key to helping them become comfortable in water.
What water activities are best for B’order Collies?
Fetch games, dock diving, and swimming are great water activities for B’order Collies. They provide both physical exercise and mental stimulation.
How often should my Border Collie swim?
This depends on your dog’s health and fitness level, but generally, a few times a week is beneficial. Always monitor for signs of fatigue and provide breaks.
What precautions should I take when my Border Collie is in water?
Ensure they wear a life vest in deep water, monitor for fatigue, provide fresh water to drink, and practice proper ear care to prevent infections.

In the quest for flawless skin, many individuals turn to various skincare products to address concerns such as acne, blemishes, and uneven texture. One such solution that has garnered attention in recent years is Clindanol. In this comprehensive guide, we will delve into the intricacies of Clindanol, exploring its benefits, usage, and effectiveness in achieving radiant, clear skin.
Understanding Clindanol
What is Clindanol?
Clindanol is a topical medication primarily used to treat acne vulgaris, a common skin condition characterized by the presence of pimples, blackheads, and whiteheads. It belongs to a class of medications known as topical antibiotics, which work by inhibiting the growth of acne-causing bacteria on the skin’s surface.
How Does Clindanol Work?
Clindano’l contains the active ingredient clindamycin, which exhibits antibacterial properties. When applied to the skin, Clindanol penetrates the pores and targets the bacteria responsible for acne. By reducing bacterial growth and inflammation, it helps alleviate existing acne lesions and prevents new ones from forming.
Benefits of Clindanol
Effective Acne Treatment
One of the primary benefits of Clindano’l is its effectiveness in treating acne. Clinical studies have demonstrated its ability to significantly reduce the number of acne lesions and improve overall skin clarity.
Minimizes Inflammation
In addition to combating acne-causing bacteria, Clindano’l also helps minimize inflammation associated with acne. This can lead to faster healing of existing blemishes and a reduction in redness and swelling.
Suitable for Various Skin Types
Clindano’l is formulated to be gentle on the skin, making it suitable for individuals with sensitive skin or those prone to irritation from other acne treatments. Its non-comedogenic formula means it won’t clog pores, making it suitable for use on oily or acne-prone skin.
How to Use Clindanol
Application Instructions
To use Clindanol effectively, follow these steps:
- Cleanse the skin thoroughly and pat dry.
- Apply a thin layer of Clindanol gel or lotion to the affected areas.
- Allow the medication to absorb fully before applying any additional skincare products.
- Use Clindanol as directed by your healthcare provider, typically once or twice daily.
Tips for Optimal Results
- Consistency is key when using Clindano’l . Stick to a regular skincare routine to maximize its effectiveness.
- Avoid applying Clindano’l to broken or irritated skin, as it may cause further irritation.
- Use sunscreen daily, as Clindano’l may increase sensitivity to sunlight.
Conclusion
Clindano’l offers a promising solution for individuals struggling with acne. Its potent antibacterial properties, combined with its gentle formulation, make it a popular choice among dermatologists and patients alike. By incorporating Clindanol into your skincare routine and following proper application techniques, you can achieve clearer, healthier-looking skin.
FAQs
1. Is Clindano’l suitable for all types of acne?
While Clindano’l is effective for many individuals with acne vulgaris, it may not be suitable for severe or cystic acne. Consult with a dermatologist to determine the best treatment plan for your specific condition.
2. Can I use Clindano’l with other acne treatments?
Clindano’l can be used in conjunction with other acne treatments, such as benzoyl peroxide or salicylic acid. However, it’s essential to follow your healthcare provider’s recommendations and avoid overusing multiple products, as this can lead to irritation.
3. How long does it take to see results with Clindano’l?
Individual results may vary, but many users report seeing improvement in their acne within a few weeks of starting Clindanol treatment. Consistent use is key to achieving optimal results.
4. Are there any side effects associated with Clindano’l?
Common side effects of Clindanol may include dryness, peeling, or redness at the application site. If you experience severe irritation or allergic reactions, discontinue use and consult a healthcare professional.
5. Can Clindano’l be used for long-term acne maintenance?
Clindano’l is generally safe for long-term use, but it’s essential to monitor your skin’s response and adjust your treatment plan as needed. Regular follow-up appointments with a dermatologist can help ensure the continued effectiveness and safety of Clindanol therapy
-
 Shops1 year ago
Publix Pharmacy Hours and Locations
-
 Shops1 year ago
Staples Store Hours: What Time Does Staples Open And Close?
-
 Shops2 years ago
Walmart Vision Center Hours
-
 Shops1 year ago
Walgreen Pharmacy Hours: What Time Does It Open & Close?
-
 Business2 years ago
Designer Clothing: Making a Statement
-

 Entertainment2 years ago
Roku Red, White, and Blue: Streaming the cultural heart of America
-
 Shops1 year ago
Walmart Deli Open & Close Hours
-
 Shops2 years ago
Kroger Deli Hours & Store Locations